This Domain Name Is Up for Sale
Contact Us

How To Root Samsung Galaxy S Duos S7562

Samsung Galaxy S Duos S7562 is an android smartphone which runs on android 4.0 ice cream sandwich. The phone has got 1 GHz processor and 768 MB RAM. The phone is suitable for an average android user as it has got a 4 inch touchscreen which is big enough to play games and videos. In this tutorial I will teach you to root galaxy s duos S7562 with stock recovery and clockworkmod recovery. If you don't want to install custom roms on galaxy s duos then you should root it with stock recovery otherwise root it by installing clockworkmod recovery. I will describe 2 methods for rooting galaxy s duos, first method is a one click method in which I will use unlockroot software to root galaxy s duos which will root the device with stock recovery, while in second method I will use ODIN to flash clockworkmod recovery to root the phone. If you have this phone then check Galaxy S Duos Tips & Tricks here.

root galaxy s duos

What's The Difference Between Stock Recovery And Clockworkmod Recovery
In stock recovery you can achieve root access without getting a yellow triangle which means that the flash counter is tripped by 1 which simply means you have rooted your device and it mainly shows up during boot up. In clockworkmod recovery you can do a nandroid backup and restore (backing up and restoring stock rom), install all custom roms, install all kinds of zips etc. These functions are unavailable in stock recovery. So its your duty to decide with which recovery you want to root your galaxy s duos.

Important Instructions
Before performing the rooting process you should follow the steps below carefully to avoid data loss.

  • Backup entire data stored on your phone's storage including files, sms messages, android apps apk, pictures, music and videos.
  • Rooting the phone will void your phone's warranty, which means that Samsung is not liable to provide technical support after you root your phone.So carefully decide whether you want to do it or not.
  • Whatever you are doing is at your own risk, so if something goes wrong you will take full responsibility of the damages if happened. You should not blame us if your galaxy s duos gets bricked.
  • This rooting procedure will work for galaxy s duos S7562 only and should not be applied on other android phones, otherwise that phone will get bricked.
  • This tutorial will only work on a windows based pc only.
Files Required
Following files are required to be downloaded. You should download them all in order to complete the rooting procedure. The download links are given below.If you are rooting with stock recovery then only download the unlockroot in 3rd step while if you are rooting with clockworkmod recovery then only download the files in first two steps.

  1. Samsung KIES for android drivers. Download here. Ignore if already installed.
  2. Samsung Galaxy S Duos Rooting Package with ODIN included. Download here.
  3. UnlockRoot software if you are rooting with stock recovery. Download Here.
Root Galaxy S Duos With Stock Recovery
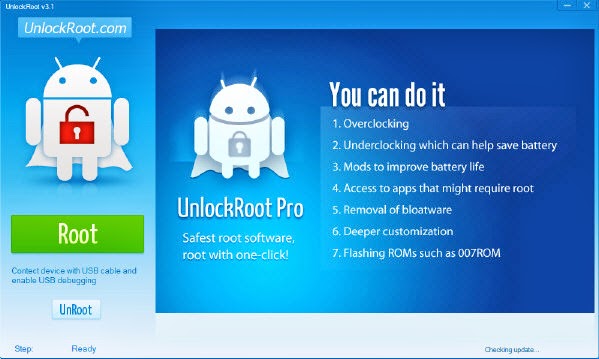
In this tutorial we are using unlockroot software to root galaxy s duos. This tutorial is best suited for you if you are rooting the phone with stock recovery. This procedure won't trip the flash counter to 1.

  • Download and install unlockroot pro from the above link and open unlockroot.exe.
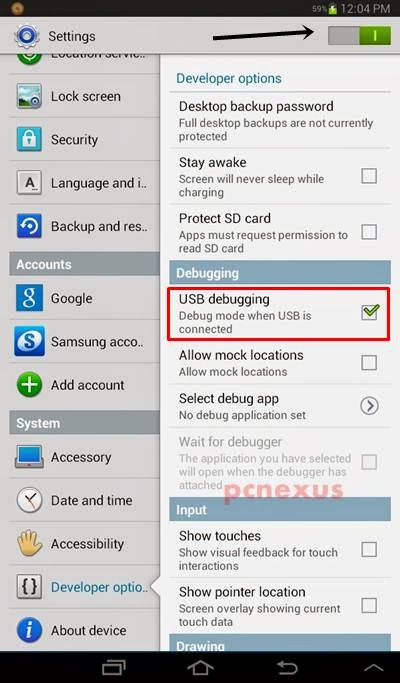
  • Enable USB debugging on your phone by going to 'Settings>Developer options>USB debugging'.
  • Now connect your phone to pc via usb cable and click 'Root' in the unlockroot software.
unlockroot

  • A list of connected devices will appear. Select your phone. It will again ask you to install a battery saver app on your phone, choose yes or no.
  • After rooting process a popup will open asking you to reboot the phone. Click 'Yes' to reboot the phone.
  • Your galaxy s duos is rooted now and you can check the root access by using the root checker app. Download it here. Also you can install any android app that require root access and in file explorer you can access android system files.
  • If you want to unroot your galaxy s duos then click the unroot button and follow the instructions.

Root Galaxy S Duos With Clockworkmod Recovery
This tutorial will root your galaxy s duos and install custom recovery called clockworkmod. With clockword you can install almost all custom android roms and take backup of existing roms on sd card, later you can restore entire android firmware with it.

WARNING : Follow the steps very carefully otherwise your phone may get bricked. If this happens then nobody will be responsible except you, so do it carefully.

  • Download and install Samsung KIES from the link given above in files section. Ignore downloading if already installed.
  • Download the galaxy s duos rooting package from the link in files section. Extract all the files on desktop in a separate folder.
  • Remove the back cover of your phone, this is the most important step as we need to remove the battery immediately after rooting process to avoid installation of stock recovery.
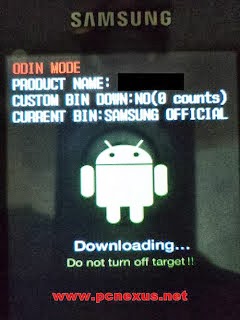
  • Now switch off your phone and reboot into download mode or odin mode by pressing the home, volume down and power buttons at the same time. Do not release the buttons unless you see a warning page.
  • Press the volume up button to enter into download mode.
  • Now open odin.exe from the folder where you extracted the root package folder and connect your phone to pc via usb cable.
  • Let odin identifies your phone. When your galaxy s duos is recognized the field under 'ID:COM' section will turn blue and in message section you will see <ID:0/011> Added!! which means your android smartphone is ready to be rooted.
  • Make sure that 'Auto Reboot' and 'F. Reset Time' are checked and do not check any other check-box except these two.
  • Now put a check mark in front of 'PDA' button.
  • Click the 'PDA' button and browse the 'recovery.tar' file from the root package folder that you extracted on desktop.
  • Now click the 'Start' button to start the rooting process. It will take few minutes and odin will return a 'PASS' message above 'ID:COM' field.

odin

  • Now here comes the important step. When odin finishes flashing the recovery your phone will reboot. Before rebooting it will vibrate. This is the right time when you should remove the battery immediately otherwise stock recovery will be installed and work done by odin will go in vain.
  • You can now disconnect the phone from pc and switch it on. Now copy the 'CWM-Superuser-3.1.3' file from the root package to your phone's internal storage or external sd card.
  • Now switch off the device and reboot it in clockworkmod by pressing home, power, and volume up buttons at the same time for few seconds.
  • In clockworkmod touch input will not work. To move up press volume up button. To move down press volume down button and to select any option press the home button.
  • When clockworkmod options appears move down by pressing the volume down button and select 'Backup & Restore' to take the backup of the stock Samsung rom. Your phone's external sd card should have free space upto 3 GB so use a sdcard with 4 GB capacity.
  • Backup of stock rom is required because if later you want to unroot your galaxy s duos then you should restore this backup of stock rom and flash the 'stock_recovery.tar' ( included in galaxy s duos root package) file via odin as you did with 'recovery.tar'
  • Now after backup operation, select 'install zip from sdcard' now either choose 'Choose zip from external sdcard' or 'Choose zip from internal sdcard' depending upon where you stored the file and browse the 'CWM-Superuser-3.1.3' zip file. Select this file and click 'Yes' to install the SuperUser on your galaxy s duos, ignore all the 'No' options.
  • Go back and reboot the phone.
  • You have successfully rooted your galaxy s duos with clockworkmod recovery.
Remove The Yellow Triangle
After rooting your phone a yellow triangle will appear during bootup. You can disable this yellow triangle by using the triangle away app. Download and install it from here. Now open it up and click 'Reset Flash Counter'. You are done.

Now you have successfully rooted galaxy s duos with stock recovery and clockworkmod recovery. If you like the post please take 2 minutes to share it.

How To Charge Samsung Galaxy Tab 2 Via USB Port On Computer/Laptop

Many users of Samsung Galaxy Tab 2 say that the tablet can’t be charged via USB. Whenever we connect the galaxy tab 2 to pc via USB the battery icon shows a cross in it which means the battery isn’t charging. But it is not like that, you can successfully charge the battery of galaxy tab 2 via pc USB port. But charging the tablet via USB will take a little longer than the standard wall charger. The reason behind this is that the computer USB provides low power to galaxy tab 2 for charging the battery, as a result the android system identifies that the current supplied by the USB isn’t enough so the battery displays a cross mark in it. Also in battery status you will always see ‘discharging’ instead of charging due to android system limitations. This doesn’t mean that the battery of your galaxy tab 2 is not charging. Well the battery charges from the USB but at slower rate as compared to the tablet’s wall charger.

How Much Power/Current Is Required To Charge Galaxy Tab 2

Samsung Galaxy Tab 2 charger has an output of 2A (amperes) so if you charge it the charger then it will charged within 2 or 3 hours. While a computer USB port only provides 0.5A (amperes) of current which is too low to charge the battery of galaxy tab 2, that’s why the pc USB takes more time to charge the tablet battery than the tablet’s charger. See the data below.

4000 mAh means if you provide 4A (amperes) of current constantly to the battery of galaxy tab 2 then it will charge in 1 hour. If the charging current is reduced then the battery charging time will be increased.

4A current = Battery will charge in 1 hour.
2A current (Wall Charger) = Battery will charge in 2-3 hours.
0.5A current (PC USB) =  Battery will fully charge in 6-8 hours.

How To Charge Samsung Galaxy Tab 2 Via USB Port On Computer Or Laptop

  • Just connect your galaxy tab 2 to pc via USB cable.
  • The battery will show a cross mark on it. Just ignore it.
  • To enable battery percentage goto Settings>Device>Display>More settings>Display battery percentage.
  • The battery percentage will be displayed next to the battery icon.
  • Now wait for at least 10 minutes. The battery will gain 1% in every 10-15 minutes which is slow charging.
  • To reduce the charging time a little bit enable ‘Power Saving’ mode. Just slide down the notification slider and touch ‘Power Saving’ mode.
  • If you just want to charge the battery of galaxy tab 2 then switch off the tablet for fast charging. Below you can see screenshots which show increase in battery percentage after charging it via PC USB.


Disadvantages

1.The current provided by the pc USB port is very low (0.5A only) for a 4000 mAh battery. So prolonged charging the battery with USB port will damage it and reduce its life. So do not always charge the galaxy tab 2 battery via USB port.

Which Tablets Can Be Charged Via USB Port

You can charge any android tablet’s battery having a power rating of 4000mAh or less via USB port on a laptop or a computer. Some tablets that can be charged via USB include the galaxy tab 2, galaxy tab 3 7.0 (SM-T210,SM-T211), galaxy tab 3 8.0 (SM-T311, SM-T310, SM-T315), galaxy note 8.0.

Lock Android Apps With Avast Antivirus For Android

Avast antivirus is the best antivirus for android. Avast for android is greatly influenced by the desktop version of avast antivirus as we find similar features in the mobile app. It provides great features like virus scanner, web page scanner, task killer and includes various security shields like app shield, web shield, message shield, file shield and firewall (requires root). So it is the best free antivirus app for android.

Recently avast antivirus for android is updated to new version which includes a new feature known as 'Application Locking' which is used to lock android apps on your phone or tablet. The good thing is that if you are using avast on your android smartphone then you don't need to download another application locking app. But in free version you can lock only two android apps. You can upgrade to premium features at very low price and can unlock unlimited apps. In this tutorial I will teach you how you can lock android apps with avast antivirus for android.

Lock Android Apps With Avast Antivirus For Android

1.Download and install avast antivirus here.
2.Open avast antivirus app and click the lock icon and click 'SETTINGS' on top right corner.


3.Now click 'Enable'. A popup will open which will ask you to enter a pin for application unlocking. This pin will be used to unlock locked android apps.
4.There are 2 more types of unlock options along with avast pin. One is gesture password and other is text password.
5.To set up gesture password (pattern lock) click 'Password type' and choose 'gesture password'.
6.Now draw your desired unlock pattern and click OK.

gesture password

7.To change password type to text password again click 'Password type' and choose 'text password' and enter your desired unlock password.
8.Now you have successfully set up an unlock password and you are ready to lock android apps with avast antivirus.
9.Click the lock icon again and put check marks on apps which you want to lock.
10.You can only lock 2 android apps in the free version. To lock more apps buy the premium version of avast.

Time Based Application Locking

In time based application locking you can choose the days and time range in which your android apps will be automatically locked and unlocked. To enable time based application locking follow the steps below.

1.Click the lock icon and click 'SETTINGS' on top right corner.


2.Put a check mark in 'Time range' and enter your password, whether it is gesture or avast pin.
3.Enter your time range in From and To and touch 'Sa' and 'Su' in days list below.
4.On all days between time range your android apps will be automatically locked. Rest of the time they will remain unlocked.

app locked by avast antivirus

Advantages Of Avast App Locker

1.No need to purchase or install other locking app.
2.Offer time and day based application locking.
3.If you buy the premium version then you will get antivirus and this feature with unlimited application locking.

Share this post if you like it.

Get 50 GB Free Dropbox Storage With Samsung Galaxy Tab 3

Dropbox is a cloud storage service which gives 2 GB free cloud storage if you create an account on it. There is a good news for Samsung Galaxy Tab 3 owners that they are getting 50 GB of free dropbox space. The 50 GB dropbox space is included with all the versions of galaxy tab 3 i.e. the galaxy tab 3 7.0 (SM-T2110),8.0 (SM-T3110 & SM-T3111) and galaxy tab 3 10.1.With dropbox you can backup your existing tablet data on cloud storage and can access it anywhere and any time with dropbox account.In this tutorial I will teach you how you can get 50 GB free dropbox space for your galaxy tab 3.


Get 50 GB Free Dropbox Storage With Samsung Galaxy Tab 3

  • Open 'Dropbox' app on your tablet and click 'Create a free account' below 'Log in' button.
  • Fill the necessary details on the next page including your email address and password.
  • After entering all details click 'Register for dropbox'.Then click 'I Agree' when popup opens.
  • Now dropbox account will open.Click Next.
  • On next page un-check 'Upload existing photos and videos' and click 'Skip'.
  • If you turn on the camera upload feature then photos and videos from your camera will automatically be uploaded to dropbox account.Its your choice whether you want to enable it or not.
  • To see the space simply click 'Options' button on top right it is button with 3 vertical dots. From this choose 'Settings'.


Samsung Galaxy Tab 3 7.0 SM-T2110 Full Review

Samsung Galaxy Tab 3 is the third version of galaxy tablets. It has been recently launched by Samsung as a successor to the previous Samsung Galaxy Tab 2. The galaxy tab 3 SM-T2110 comes with a good hardware specification and runs on android 4.1.2 jellybean, android 4.2.2 update is expected to come soon. The galaxy tab 3 is different from the previous versions of the galaxy tablets which didn't have capacitive buttons and a hardware home button. Samsung has introduced its flagship design in its new galaxy tab 3 models. The new galaxy tab 3 SM-T2110 is 12 percent lighter than it predecessor the galaxy tab 2 and it only weighs just 304 grams. In this post I will write a full review about this galaxy tab 3 and will also tell you its pros and cons which will let you decide whether to buy this tablet or not.

Samsung Galaxy Tab 3 7.0 SM-T2110 Full Review

1.Design : The Samsung galaxy tab 3 SM-T2110 has a new improved design which corresponds to a flat bar. It is easier to hold in hand due to the good grip of plastic body. The tablet is much lighter than its previous versions, so holding it in hand for a long time won't give you wrist pain, it just weighs only 304 grams. The camera is positioned at center on the rear side. At the bottom you will find two capacitive touch buttons with back-light and a home button in the middle. The design of galaxy tab 3 is similar to Samsung flagship devices like galaxy note.

galaxy tab 3

2.OS And Features : The Samsung galaxy tab 3 runs on android 4.1.2 jellybean OS with Samsung apps like all share play, group play, Samsung link, dropbox (50 GB storage space free). Smart stay feature is also present, in which screen won't go off if you looking at it. A new feature called Wi-Fi channel bonding utilizes 2 channels (dual band) to double your access for faster transactions and connections (143 Mbps).

3.Screen : The galaxy tab 3 7.0 features a 7 inch capacitive touchscreen with a resolution of 1024x600 pixels with a pixel density of 169 ppi. The screen is not very bright as compared to its predecessor galaxy tab 2. The screen is just normal TFT LCD with 16 M colors. While playing HD videos and games the screen will definitely disappoint you. It doesn't have PLS LCD touch screen as in its previous version galaxy tab 2. The screen contrast is very low and colors are not vibrant enough. The screen displays feeble colors which is very bad. Besides having 16 M colors display and 169 ppi the galaxy tab 3 SM-T2110 screen is not very good for playing HD games and viewing HD videos.

galaxy tab 3 7.0

4.Camera : It has two cameras. The primary camera is 3.15 MP and is located at the top center on the rear side. The camera has a resolution of 2048x1536 pixels and can record videos at 30 fps. The rear camera is fine enough to take photos in day light. Due to lack of a led flash the photos will be dull in low light. The front camera is 1.3 MP and can be used for self shot and video calling. It also lacks camera auto focus feature.

5.Storage And Memory : The galaxy tab 3 has an inbuilt storage of 8GB and it can be further expanded to 32 GB via micro sd card slot. Applications can't be installed on sd card, and you have to install them on the tablet only. It has 1 GB of RAM out of which 770 MB is user available and rest is android system reserved. So apps would run smoothly due to this enough amount of RAM.

6.CPU : It has Marvell PXA988 1.2 GHz dual core application processor which is quite good enough for playing heavy android games. The cpu can handle apps running simultaneously smoothly. Dual core cpu is good for gaming because android games won't lag and hang on the tablet.

7.Battery : The galaxy tab 3 has 4000 mAh battery which can stay more than 1 day. The battery is powerful enough to power any keyboard, mouse and a flash drive. You can see this tutorial to connect keyboard, mouse and USB flash/pen drives to your galaxy tab 3.

8.Video Playback : The galaxy tab 3 can play any video format including the avi, mpeg, mp4, divx, wmv, h263, h264 and mkv (matroska video). So you don't need to convert videos as you can directly put them in your tablet and play them in Samsung video player. 720p HD videos are fully supported, but screen resolution may disappoint you.

Pros


  • Multi touch capacitive touchscreen.
  • HD video playback support.
  • 1.2 GHz dual core cpu with 1 GB RAM.
  • 4000 mAh battery.
  • Easier to hold and light in weight.
Cons

  • No LED flash and autofocus in camera.
  • Internal storage is only 8 GB, out of which 5 GB is user available.
  • Screen is not very good. Colors are not vibrant and is not good for playing HD videos and games.
  • Costlier than galaxy tab 2 which is better than this.
Comparison With Galaxy Tab 2

Attribute
Galaxy Tab 3
Galaxy Tab 2
Winner
1.Storage
8 GB. Only 5 GB is user available.
16 GB. 11 GB is user available.
Galaxy Tab 2
2.Screen
TFT LCD
PLS LCD
Galaxy Tab 2
3.OS
Android 4.1.2. Android 4.2.2 update is expected.
Already started updating to android 4.2.2.
Galaxy Tab 2
4.Price
$283 approx.
$283 approx for 3G version. $166 for wi-fi only version.
Galaxy Tab 2
5.Wi-Fi Version
Not yet available
Available
Galaxy Tab 2
6.GPU
Not confirmed
PowerVR SGX 540
Galaxy Tab 2

How To Break Pattern Lock On Samsung Android Phones Without Factory Reset

Android smart phones comes with built in various lock screens that protect your android phone from unauthorized access. Some of the most popular lock screen include the pattern lock, the number lock, the face lock and the password lock. But pattern lock is widely used which is moderately difficult to break it.The only way to break the pattern lock is to factory reset the android phone in android system recovery mode by wiping the phone. But in this tutorial I will teach you to break the pattern lock on android without factory resetting the phone if you are using a Samsung android phone. This method will save your data because you don't need to wipe your phone and you still be able to break the pattern lock.

pattern lock on android

This tutorial works only with Samsung android smartphones. We will use Samsung-Dive to break the pattern lock on your Samsung smartphone. Samsung-Dive is a remote control service that helps you to locate and track your lost or stolen Samsung android phone. You will need a Samsung account to use Samsung-Dive.

Important Points
  • This tutorial will only work with Samsung android phones that have a valid Samsung account associated with them.
  • If data connection remains always off on your phone then Samsung-Dive will not work. To break the pattern lock remotely your phone should have a working data connection.
  • This tutorial is not limited to pattern lock and with this you can break any kind of android lock-screen including the face lock, number lock, and password lock.
  • If at present you don't require this tutorial then read it carefully because it will prove helpful in future, the day when you accidently forget your lock-screen pattern or password.
  • This tutorial will work for both samsung android smartphones and tablets (both wi-fi and 3G versions).
  • Background data should be enabled on Samsung smartphones running android 2.3 or earlier.

Break Pattern Lock On Samsung Android Phones Without Factory Reset


  • First of all sign up for a Samsung account. You can see how you can sign up here.
  • After setting up Samsung account on your android phone goto http://www.samsungdive.com.
  • Login with your email and password.
  • Your phone will be visible here. A green dot indicates that your phone is online and is ready to accept remote commands.
  • The Samsung-Dive remote control page will open. Select 'Unlock my screen' and click 'Unlock'.
  • Samsung-Dive will send an unlock command to your android phone via network and the pattern lock will be removed and will automatically be reset to swipe lock.

break pattern lock android

  • Now you can choose a different lock-screen for your phone.
You have successfully broke the pattern lock on your Samsung android phone without factory reset.

If Samsung Dive Doesn't Work

If you haven't set up Samsung account on your phone then Samsung Dive will not work. There is only one way left to hard reset the phone in recovery mode. Do as follows.
  • Switch off the phone.
  • Reboot in recovery mode by pressing 'Home', 'Volume up' and 'Power' button at the same time. Release the buttons when phone vibrates.
  • Now move down by Volume down key and select 'Wipe Cache Partition'. Then go back to main menu.
  • Then select 'Wipe data/Factory reset'
  • This will remove the pattern lock. Also there is some chance that you would not lose any data stored on the internal phone's storage if your phone is running on android 2.3 gingerbread if you first 'Wipe cache partition' before 'Factory reset'.

Warning: If you are going to hard reset the phone then make sure that you know the details of the Google account being used and synced on your phone. Do not hard reset if you don't know the password of your Google account. Because if you hard reset your Samsung phone then 'Factory Reset Protection' will be automatically activated on your phone. After that you will not be able to login in to your phone for 24 hours. You can only unlock the phone with the previously synced Google account. Read more about 'Factory Reset Protection'.

Share this post if you like it.

How To Resolve Google Play Store Error 927 On Android

Google Play Store sometimes updates itself in the background on android phones. During this time, no app can be downloaded from play store. If you keep downloading the apps during the upgrade process then google play store will return an error 927. This error 927 corresponds to the problem that apps can't be downloaded due to some problems encountered by the play store app. When error 927 appears on your android phone during downloading apps from play store then your downloaded apps will not be installed and your mobile data will be wasted. In this tutorial, I will teach you how to resolve Google play store error 927.


google play store error 927

Resolve Google Play Store Error 927


1. Clear App Cache: Error 927 sometimes appear due to no space left for storing cache on your android phone.You have to clear the old cache to let the app store new cache. To clear the cache follow the steps below.

Clear App Cache On Android 2.3 Gingerbread : To clear Google play store app cache on android 2.3 gingerbread, go to 'Settings>Applications>Manage applications>Google Play Store>Clear data & Clear cache'. Also goto 'Settings>Applications>Manage applications>Google Play Services>Clear data & Clear cache'.

clear cache of google play store app

Clear App Cache On Android 4.1/Android 4.2/Android 4.3 Jellybean:  To clear Google play store app cache on android jellybean go to 'Settings>Device>Application manager>Google Play Store>Clear data & Clear cache'. Also goto 'Settings>Device>Application manager>Google Play Services>Clear data & Clear cache'.

To clean entire cache stored on your phone download android assistant apk here.This app will clean all the cache stored on your phone.Install this app and open it.Click "System Clean" on below right and then again click "Clean Selected". Now go back to the main menu and click "Tools" on the tops right.Now select "Cache Cleaner".Now click "Clean All".

2. Update The Google Play Store App: Update the Google play store app to its latest version to avoid error 927. The play store update is automatically downloaded on your android but there is no guarantee whether the update downloads itself. So I recommend you to download the latest play store apk from our Google Play App Archives and install it manually to quickly fix the error 927. You can download the apk from archives below, only download the app with '[Latest]' tag.


Google Play Store App APK Archives

3. No Space Left On Phone: Your phone should have adequate space left to download and install apps from Google play, otherwise due to lack of storage space they won't be installed. So free enough space on your phone.

4. Solving The Low Storage Problem

You will start getting error 927 in play store when your android phone's storage becomes 200 MB. However, in this much of space, you can install few more apps, but this space is reserved by android for other android apps, so the play store app would not download any apps. There is only one solution that you download android apps apk and sideload them on your android phone. Just download the apk and install it on your phone, you will not any error.

If your phone is running short of internal storage then either free up space or buy a new android phone with at least 16 GB of internal storage. If you are an experienced user then you may root your phone to increase internal storage.

After following above tips the Google play store error 927 will be resolved. If you ever face it again then re-apply these tips.

Update Samsung Galaxy Tab 2 7.0 P3110 Wi-Fi To Official Android 4.2.2 Jellybean XXDMH1 Firmware

Samsung has recently pushed out android 4.2.2 update for the Galaxy Tab 2 7.0 P3110 Wi-Fi. Its a good news for the tab 2 users who were waiting for this update since a long time. Samsung has recently launched the android 4.2.2 update for galaxy tab 2 7.0 p3110 with some good UI enhancements and improved battery performance.The launcher of Samsung galaxy tab 2 7.0 Wi-Fi is inspired by galaxy S4. However the android 4.2.2 update for galaxy tab 2 7.0 Wi-Fi is officially available in the UK region only. So UK users can update their galaxy tab 2 either via OTA updates or Samsung KIES. If you live outside of UK region then you can still update your galaxy tab 2 p3110 with the official android 4.2.2 XXDMH1 firmware by reading the step by step tutorial that I will teach you here.

galaxy tab 2 android 4.2.2 jellybean

What's New In Android 4.2.2 XXDMH1 For Galaxy Tab 2 P3110

  • Dedicated customizable notifications panel in the status bar.
  • Lock-screen widgets.
  • Multiple user accounts.
  • Daydreams screensaver mode.
  • Widgets and launcher inspired from Galaxy S4.
  • Better accessibility.
  • Improved battery performance.
Firmware Details

Model: GT-P3110
Country: United Kingdom
Version: Android 4.2.2
Changelist: 1249439
Build date: Sat, 03 Aug 2013 08:08:27 +0000
Product Code: BTU
PDA: P3110XXDMH1
CSC: P3110OXADMH1
MODEM: P3110XXDMH1

Files You Need

  • Samsung USB Drivers download here
  • ODIN for windows.Get it here
  • Official Android 4.2.2 XXDMH1 firmware for galaxy tab 2, download here
Pre-Requisites

Before you update your galaxy tab 2 7.0 p3110 to the latest android 4.2.2 you should follow the below mentioned guidelines carefully to avoid data loss and unwanted damage, as failing to do so can cause serious damage or data loss to your tablet.

  • Backup entire data stored on your tab 2 7.0 either on your pc or a usb drive because during update process the entire data will be wiped. To connect and backup data on a usb drive from your tab 2 7.0 see this article.
  • Use android assistant or androzip to backup android app apk's. Later you can re-install them.
  • Remove sd-card after making a backup of it.
  • Enable USB debugging by going to 'Settings>System>Developer options>Debugging>USB debugging'. But first enable 'Developer options' by turning the slider on top right towards right. See the image below.

enable usb debugging on galaxy tab 2

  • The battery should be charged to more than 50%. To see battery percentage on galaxy tab 2 p3110 goto 'Settings>Device>Display>More settings>Display battery percentage'. The battery percentage will be visible next to battery icon.
Important Notes

Before updating your galaxy tab 2 7.0 p3110 Wi-Fi I would like you to go through the below mentioned important points to ensure successful update of your galaxy tab 2 7.0 p3110 Wi-Fi.

  • This tutorial is meant to be applied only on Samsung galaxy tab 2 7.0 P3110 Wi-Fi only and it should not be applied on other android phones and tablets.
  • This tutorial will only work on carrier unlocked versions of galaxy tab 2 7.0 Wi-Fi.
  • If your tab 2 is already rooted then after flashing with the official update you will need to re-root it again, because after update it will loose root access.
  • If you galaxy tab 2 is not rooted then there is no need to flash a custom recovery.
  • This process will not void your tablet's warranty and the flash counter will remain the same.
  • If you live in UK(United Kingdom) then do not follow this tutorial unless OTA or Samsung KIES doesn't update your galaxy tab 2 7.0 Wi-Fi.
WARNING : This tutorial is meant to be applied only on the carrier unlocked Wi-Fi version of the galaxy tab 2 7.0. By applying this update tutorial you are taking the damage liability that may happen if the update fails. So for any kind of damage we can't be held responsible. Do it at your own risk.

Update Samsung Galaxy Tab 2 7.0 P3110 Wi-Fi To Official Android 4.2.2 Jellybean XXDMH1 Firmware

  • Download and install Samsung KIES from the link given above. This will install all necessary android drivers on your pc.
  • Download ODIN for windows from the link given above and extract it a separate folder.
  • Download the android 4.2.2 update for galaxy tab 2 and extract it in a separate folder. Keep both folders on the desktop for convenience.
  • Now switch off your tablet and again reboot it into download mode or odin mode.
  • To reboot in download mode simply press power button and volume down button at the same time. Do not release the buttons until you see a warning screen. Then press the volume up button to enter into download mode.See the pics below.

download mode galaxy tab 2 7.0

  • Now launch odin on your pc and connect your tablet to pc via USB cable. Wait for few seconds and let odin recognize your tablet.
  • When your galaxy tab 2 is recognized by odin you will see '<ID:0/025> Added!!>', also the ID:COM bar will turn light blue showing you '0:[COM25]' which means that you have successfully connected your tablet to odin.

odin for windows

  • Make sure that 'Auto Reboot' and 'F. Reset Time' are checked and do not check any other check-box except these two.
  • Now put a check mark in front of 'PDA'
  • Click the 'PDA' button and select the file from the extracted android 4.2.2 rom folder having an extension of .md5.
  • Click the check-box in front of 'PHONE' button and click it. Choose the file having 'modem' in its name. Its extension can be *.tar, *.md5, *.gz, *.smd, *.tgz, *.bin. Choose this option only if you find a file in the extracted folder having 'modem' name in it.
  • Click the check-box in front of 'CSC' button and click it. Choose the file having 'csc' in its name.
  • Click the 'PIT' button and choose the file having '.pit' extension.
  • Now you are ready to flash your galaxy tab 2 7.0 p3110 with latest android 4.2.2 jellybean update.
  • After checking everything click the 'Start' button to initiate the update process.
  • Now wait for few minutes. After a successful update odin will return a message 'PASS' above 'ID:COM' section.
Now you have successfully updated your galaxy tab 2 7.0 p3110 wi-fi to official android 4.2.2 jellybean XXDMH1 firmware. You can check it by going to 'Settings>System>About device'. Here you can check details of latest android 4.2.2 firmware like its version, kernel version and build number.

If Odin Fails

If odin breaks the update process then disconnect your tablet from pc and close odin. Now reboot your tablet again in download mode as told above. Again relaunch Odin on pc. Then connect your tablet to pc and repeat the update process step-by-step. 

Problems After Updating Galaxy Tab 2 P3110 To Android 4.2.2 Jellybean XXDMH1

If after updating the phone you are getting some problems in galaxy tab 2 7.0 p3110 like lags,continues boot loop or the phone hangs or halts the try the following steps.

  • Turn off the tablet and reboot into recovery mode by pressing the volume up and power buttons at the same time.
  • Do not release the buttons unless you see android system recovery.
  • Now move down by pressing volume down key and select "wipe data/factory reset".Press the power button to select this option.Your device will be factory reset.
  • Now go back and select "wipe cache partition".
  • Now again go back and select "reboot system now".
  • You are done.
Gallery


galaxy tab 2 p3110 home screen android 4.2.2


galaxy tab 2 p3110 android 4.2.2


If you face any problem while updating your galaxy tab 2 7.0 P3110 then feel free to ask. Share this article if you like it.

How To Locate And Track Stolen Or Lost Samsung Android Phone

Samsung android smart phones come with a special feature that allow you to track, locate, lock and wipe your Samsung smart phone remotely. You can track any lost Samsung smart phone by two methods. One is the basic method and other one is advanced. The basic method just only include the mobile tracker in which whenever someone changes the SIM you will be notified about thief’s mobile number via sms messages sent on mobile numbers stored in mobile tracker.

The advanced method include locating, tracking, looking and wiping your Samsung android phone remotely via Samsung-Dive. For this you will need a Samsung account whose credentials (Username & Password) should be stored on your smart phone. In this post I will teach you how you can get back your lost Samsung android phone by using two methods, mobile tracker and Samsung-Dive. The main thing about tracking a lost Samsung android phone is that you are tracking it without any app.

Data backup is essential so in case you lose your phone you can restore the data later. You should always back up your Samsung android Smart phones with WonderShare MobileGo in case losing all file in case it got stolen or lost.

samsung dive

But before this you will need a valid Samsung account to use the above stated tracking services. First I will teach you to create a Samsung account.

How To Create A Samsung Account

  • Goto this link https://account.samsung.com/account/signUp.do
  • Enter your details here correctly and check the terms and conditions check-box. Then click ‘Continue’.
  • In second step you will be asked to verify or activate your account by verifiying your email address.
  • Login in to your mail account and click the verification link for account activation.
  • Now on your android phone go to Settings>Account and sync>Add account>Choose Samsung.
  • For Samsung smart phones running ice-cream-sandwich and jellybean 4.1 goto Settings>Accounts>Add Account>Choose Samsung.
  • Choose ‘Sign In’ and enter the email address and password to sign in.
  • After Signing In Samsung account will be visible in accounts section.


Locate And Track Stolen Or Lost Samsung Android Phone

Now you have successfully created a Samsung account, so you are ready to setup mobile tracker and Samsung-Dive. First I will teach you to enable mobile tracker.

Enable Mobile Tracker On Samsung Android Phones

Mobile tracker is basically a SIM change alert function which is configured with your mobile phone number. So whenever the SIM is changed with new one, your phone sends alert messages to the ‘alert recipients’ numbers stored in mobile tracker from thief’s mobile number. You will receive sms messages from thief’s mobile phone number and you can easily catch him/her by mobile phone number.

Alert Recipients can be your family members, your another phone number or friends. When your phone’s sim is changed alert recipients will be notified of your stolen phone.

To enable mobile tracker on Samsung android phones, follow the steps below.

  • For Android 2.3 Gingerbread : Goto Settings>Location and security>Find my mobile>SIM change alert>Check it and enter your Samsung account password.

    For Android 4.1 Jellybean : Goto Settings>Personal>Security>Find my mobile>SIM change alert>Check it and enter Samsung account password.
  • Now below it click ‘Alert message recipients’. Enter the password. Enter two trusted mobile phone numbers in it with full country code. The numbers can be of your family members.
  • Now in SMS message you can enter your custom message like ‘My phone is stolen and you have received a sms from thief’s mobile number’. Click done to activate.
  • The same sms message will be sent to your alert recipients from thief’s mobile number which will expose his mobile number to alert recipients and you can catch him/her very easily.


Locate And Track Stolen/Lost Samsung Android Phone With Samsung-Dive

Samsung-Dive is a remote service in which you can track, locate, lock and wipe your phone remotely. This only requires a Samsung account and ‘Remote controls’ enabled your phone before it is stolen. To track your stolen phone with Samsung-Dive follow the steps below.
1.First enable ‘Remote controls’ on your Samsung android phone by going to ‘Settings>Location and security>Find my mobile>Check Remote controls’. Enter your password to enable it.
3.For android 4.1 Samsung smart phones goto ‘Settings>Location and security>Find my mobile>Check Remote controls’. Enter password click OK and see the image below.
3.Goto http://www.samsungdive.com and login with your Samsung account. You will see an image like this below.


Note : You can use a single Samsung account for multiple phones.Now I will teach you about all the Remote controls by Samsung-Dive.


Samsung-Dive Remote Controls

1.Locate My Mobile : Click this to see the location of your lost or stolen Samsung android phone on Google maps, the GPS on your stolen phone will automatically enable and will give phone’s location. You will see the current location of your phone in Samsung-Dive. Click ‘Start Tracking’ to track the phone in real-time at every 15 minutes interval for the next 12 hours.

2.Lock My Mobile : Click this to lock your mobile instantly. In the message you can enter your custom message and include your phone number in it. The same message will be displayed on stolen Samsung phone. Now enter a phone number that is with you. Now enter a pin of your choice. Now click ‘Lock’. The phone will be locked with your message and phone number displayed on lock screen. The phone number you entered will be displayed on screen of stolen/lost mobile. The other person having your phone can call only on this number by clicking it. The lock screen will look like as follows on stolen phone.


3.Ring My Mobile : Click this to ring your phone remotely any time you want. The phone will ring for one minute.


4.Call/Message Forwarding : The calls and messages can be forwarded on your desired number. If this option is enabled then when any call or message comes on the stolen Samsung phone they will be forwarded to your desired number, this mobile number should be with you. Click this option, now enter same mobile number for call and sms forwarding. Now click ‘Execute forwarding’.


5.Call Logs : You can retrieve call logs from stolen Samsung android phone. These call logs will include the phone numbers dialed, received, and missed by thief. Call logs will be displayed in Samsung-Dive with name, number and date. To retrieve call logs click it and tap ‘Retrieve call logs’.

retrieve phone calls remotely

6.Wipe My Mobile : You can remote wipe your stolen Samsung android phone. Wiping should be done if you can’t get your phone back. Remote wipe will delete all the data stored on your phone even the Samsung account, so do it as a last resort when you are unable to get your phone back. This will erase data on sd card and SIM card. Click ‘Wipe my mobile’ enter your password and click ‘Wipe’. There is another function ‘Factory Data Reset’ which will erase your phone only. I am not sure about the wipe and factory data reset function as how will they execute. Wipe function can only delete data stored on sd card and SIM card while factory data reset will erase the phone not sd card. So wipe sd card first. Do it at your own risk.


7.Unlock My Screen : You can remotely unlock your screen. Some Samsung phones doesn’t support this.

Note : For Samsung phones running android 2.3 gingerbread background data should be enabled, otherwise remote controls will not work and phone will always remain offline in Samsung-Dive. You can only track the phone when it is connected to data network and background data is enabled on it. But in phones running android ics or later there is no such problem and phone can be tracked whenever it is connected to data network.

Now you can easily track your lost/stolen Samsung android phone either by using mobile tracker or Samsung-Dive. Share this post if you like it.

Avast Free Antivirus 2013 For Microsoft Windows Full Review

Avast Free Antivirus 8.0 is the leading free antivirus program available today. Avast software is providing antivirus services since 1988.Avast free antivirus is the best security software available for Microsoft windows and Apple's MAC. You can trust an antivirus program which has 25 years of expertise in providing best security against all kinds of viruses, malwares, spywares and hacking. Avast free antivirus is the only free security program that provides best security features for one year. However at any time you can buy the paid version of this antivirus with internet security, firewall and safe zone for 1 pc at just $16.4 dollars or 999 INR for just one year.

However if you do not want to buy the paid version of avast antivirus then you can continue to use the free version which will provide basic protection against malwares and spywares. This antivirus is worth every penny you spend on it to maximize your online security and defend latest threats to your pc. In this post I will tell you about some essential features of avast antivirus 2013 which will include both the free and paid services. After reading this post you will know why avast is best for your windows 7 and windows 8 pc.

Avast Free Antivirus 8.0 2013 Special Features

The features and service that I am going to tell here are free and you don’t have to pay for these features.

Antivirus

The avast free antivirus provides basic security against viruses,malwares,spywares,PUP,rootkits,and Trojans. It is very good at catching viruses and all kind of potentially unwanted programs. There are two types of system scan available, one is quick scan and other one is full system scan. No virus can go un-noticed in full system scan. When avast finds a virus it automatically moves it to virus chest therefore disabling it from doing any damage to your pc. In virus chest the infected file is isolated from the whole system and can’t do any harm to your pc. You can also delete these infected files completely from virus chest. To access virus chest goto ‘Maintenance>Virus Chest’.


Shields

The avast free antivirus 8.0 provides a total of 8 security shields that perform different tasks in real-time to monitor anything suspicious that happens to your pc. These security shields include

1.File System Shield : The File System Shield is the main component of the avast real-time scanner. It monitors all files and programs stored on your computer.

2.Mail Shield : The mail Shield monitors all your e-mail traffic and scans all messages even before they reach your computer and have the chance to do any harm. It scans inbound mail (POP3, IMAP4),Outbound mail (SMTP) and newsgroup messages (NNTP).

3.Web Shield : The Web Shield scrutinizes all your web browsing activities, and eliminates any online threats even before your web browser sees them.

4.P2P Shield : The P2P Shield monitors downloads from most P2P applications vastly eliminating the security risks associated with these types of programs. Some P2P applications include utorrent,Frostwire,FDM,LimeWire,BearShare,Opera’s DC++,iDC++,BitComet,Bit Torrent etc.

5.IM Shield : The IM Shield intercepts all downloads from instant messaging applications and makes sure they are clean. Some IM applications include MSN/Windows Messenger,Yahoo! Messenger,AIM,Skype,Google Talk,Trillian,PalTalk Messenger etc.

6.Network Shield : The Network Shield monitors all network activity and stops any viruses that try to infect your system via the data network. It also blocks access to known malicious websites.

7.Script Shield : The Script Shield intercepts all scripts executed on your system (including scripts received through HTTPS protocol). It checks all scripts that runs on every browser or on other applications installed on your pc.

8.Behaviour Shield : The Behavior Shield monitors your computer for suspicious behavior, alerting you if any unusual behavior is detected. It monitors the system for low-level rootkits, malware-like behavior and unauthorized system modifications.

Software Updater

The avast free antivirus automatically scans your pc for outdated software applications and tells you about their latest updates if available. You should keep all the software applications installed on your pc up-to-date, because outdated softwares are vulnerable to viruses. To enable or disable automatic software updater open it and click settings.Then check or uncheck ‘Automatically download updates if possible’.


Browser Cleanup

This can be found in Tools>Browser Cleanup. Browser Cleanup wizard removes all the toolbars installed in your browser. It removes all toolbars installed on all browsers on your pc. To remove toolbars go to Tools>Browser Cleanup>Start avast! Browser Cleanup NOW. Then choose the desired browser. Also you can enable/disable addons of any browser or reset it to its default values.


Site Blocking

Avast allows you to block access to specific websites/URLs. To block access to any website first go to Tools>Site Blocking>Enable site blocking>Enter address>Add. You can add as many sites as you want to block. If someone tries to open that website then they will not open.


Desktop Sharing/PC Remote Assistance

By using this feature you can connect and share desktops with other avast users. This is useful for technical support. There are two types of remote assistance. First you want to take assistance from someone or secondly you want to give remote assistance to someone. If you want remote assistance then go to Maintenace>Remote Assistance>Allow Remote Control. A code will be generated, you should give this code to the assisting person. While the second person should choose ‘Control Remote Computer’ and enter the code provided to him by you. After a successful connection you can share your desktop screens with each other.

remote assistance by avast

Paid Services By Avast

Avast Internet Security

You can anytime upgrade to avast internet security for 1 pc for one year at just $16.4 dollars or 999 INR, to maximize your online security. This will include firewall, safezone  and internet security.Go to Market>Buy Products.All payments are accepted via credit cards.

SecureLine

SecureLine is a paid VPN service that both secures and anonymizes your internet connection on public or ‘open’ Wi-Fi. Nobody can see who you are or what you are doing on the internet. It hides your computer’s ip address and allows you to surf the web anonymously. SecureLine has a 24 hour trial period and it can be purchased for $59.99 for 1 year and $7.99 for 1 month.To buy it go to MARKET>SecureLine VPN


Avast Easy Pass

Avast Easy Pass encrypts your passwords and basic personal data for completing online forms. It stores your login credentials in files that are encrypted using military-grade AES encryption.Data transfers use Secure Sockets Layer (SSL), on both your computer and avast servers to protect your internet communications. It can be purchased for $9.99 per year.

Avast Premier

Avast Premier is an antivirus security suite that provides the internet security and a new feature called Data Shredder in which you can permanently delete any file from hard disk to prevent it from recovering. It can be purchased for $29.5 per year.

paid services by avast

Get One Year Of Free Avast Protection

To get one year of free avast protection you should first download and install avast free antivirus and then register an account with avast. Avast will send you the one year license key to your registered email. Enter this key in Maintenance>Registration>Enter Key.

This was the full review of avast free antivirus 8.0 2013. Now you can easily decide whether to buy it or not.

Connectify : Turn Any Windows Laptop Into A WiFi Hotspot

Every windows laptop comes with inbuilt wifi which is used to access wireless internet in your local area through wifi connection.If you have your own wireless network or ADSL LAN then you can turn your laptop into a portable wifi hotspot.A wifi hotspot can provide wireless internet access to near by device that support wifi networks.These devices can be smart phones,PDA's or other windows laptops or macbooks.In this tutorial I will teach you how you can convert your windows laptop into a wifi hotspot.

What Types Of Networks Can Be Used

  • 2G/GPRS usb tethered via smart phones on windows laptop.
  • 3G and 4G usb tethered via smart phones on windows laptop.
  • Broadband/LAN
  • WiFi
  • Almost any kind of wireless or wired network to which your laptop is connected.

Turn Any Windows Laptop Into A WiFi Hotspot Via Connectify

Connectify is a software for windows which converts any kind of wireless or wired network used by your laptop into a wifi hotspot.

  • Download and install connectify from here.
  • Now open connectify.It will open in the right side of the screen.
  • Now enable the wifi of your laptop.
  • In 'Hotspot Name' enter the desire name for wifi hotspot.Then enter the required password.
  • In 'Internet' option choose 'Automatic'.
  • In 'Advanced' settings under "Wi-Fi' option choose 'Wireless Network Connection'.
  • In 'Security Mode' choose 'Access Point,WPA2-PSK'.

connectify

  • Then click 'Start Hotspot'.At this time your laptop's wifi should be ON otherwise you will get an error configuring hotspot 'CF008002'.
  • When the network is configured the 'Clients' tab will automatically open which will show you the details of users currently connected and using your laptop's wifi via hotspot.


Now you have successfully turned your windows laptop into a wifi hotspot.Now you can connect any smart phone,tablet or a macbook to that hotspot and use wireless internet via wifi.

Connect An Android Smartphone To Windows Laptop Hotspot

  • Now your laptop hotspot is running.So on an android smartphone goto wifi settings and scan for wifi networks.
  • After scanning the laptop's network will be visible in your android phone.Click on that to connect and enter the password which you entered during connectify setup above.

android wifi hotspot

  • Now you can access high speed wireless internet on your smart phone.
  • This tutorial applies to all smartphones,tablets or macbooks.
  • You can turn your android smartphone into a wifi hotspot and can use its network on a laptop.See it here.